Showing posts with label Heartfelt Creations. Show all posts

Wednesday, 30 December 2015

New Arrival - Coffee Talk by Heartfelt Creations

Hi Everyone

I hope you had a wonderful Christmas and was able to catch up with family and friends.

On Christmas Eve, we received a delivery from Heartfelt Creations of the new Coffee Talk stamps.

I've been eagerly awaiting the arrival of the stamps and the long weekend gave me an opportunity to have a play.

You'll find the release on our website - http://michellescardsandstamps.com.au/products-page/heartfelt-creations/ and here's a couple of images from the release.
The release has stamps, dies and papers and are so much fun to play with.
 
Here's 2 cards I created over the weekend.


 The first card was stamped on white card with a Memento ink pad and coloured with Copic Markers - E40, E41, E43, E47, E49, R81, R83 and R85.  I mounted the centre image up and cut a little slit in the 'coffee' to insert the spoon in.
 The second card is a 3 part card, the coffee cups fold open to reveal the chalkboard writing in full before it opens to the inside of the card.

I coloured the Coffee Cups with Copic Markers E40, E41, E43, E47, E49, B93, B95 and B97.  The chalkboard was stamped on Bazzill Beetle Black with Versamark and them embossed with WOW Embossing Powder - Opaque White.  I stamped an extra spoon and added it to the chalkboard after colouring it with Copic Markers.

Happy Stamping
Michelle & Robyn


Monday, 1 June 2015

Calendar Project 2015 - June

Hi Everyone

This is the last of my calendar projects this year - June.

As you know, I'm a bit of a sucker for Sunflowers and have loved the Heartfelt Creations Classic Sunflower stamp set (HCPC3626) for some time.

Previously, I've used Copic Markers to colour my image, but this time I used Distress Markers.


I've stamped the Classic Sunflower image on Watercolour card (300gsm) using an Archival Coffee Ink pad and coloured it with Distress Markers Wild Honey, Rusty Hinge, Forest Moss, Brushed Corduroy and Gathered Twigs.  Once dry, I blended around the edges with Distress Ink pads Wild Honey and Brushed Corduroy and edged with the Coffee Ink pad.

I then adhered it to my base card of Bazzill Ivy and Marigold, added my calender piece and the letters for June which were cut using the Tim Holtz ABC123 die set (660210).

Over to Jennifer now for the next 3 months.

Happy Stamping
Michelle


Sunday, 15 March 2015

Bella with Dahlia

Hi Everyone

The Wild Rose Studio stamp range has been really popular since we bought them in and I'd love to share this card with you.

Starting with Bazzill cards Thunder, Stormy and Petalsoft, I created this card.  On the Petalsoft card, I stamped the Stampendous Floral Tapestry (CRR217) using an Archival Watering Can ink pad.  The beauty of using the Watering Can ink pad, as it is a grey colour, it doesn't dominate as a ink pad like a black would, but also not a watermark ink pad.

The words are from Heartfelt Creations - Classic Message (HCPC3354) and was stamped in Archival Jet Black.

Now for Bella - on HP Colour LaserJet Paper, stamp Bella using a Memento Tuxedo Black ink pad.  Colour with Copic Markers and mount up on the card as shown.

Copic Markers C0, C3, C5, C7, YG09, Y38, YR07, R000, R20 and R22.

Happy Stamping
Michelle


Monday, 9 March 2015

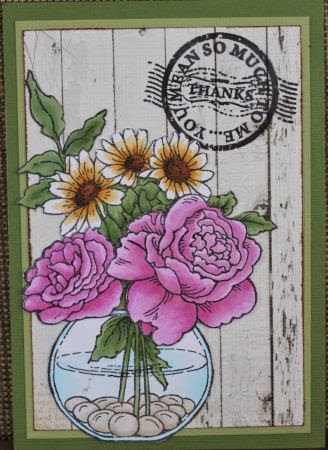
You Mean So Much To Me

Hi Everyone

This Stampendous stamp (Bowl Bouquet CRR199) is a lovely group of flowers which could be used for so many reasons.

This card starts with a Bazzill Leapfrog and then Aloe Vera card and then I added Kaisercraft's Base Coat III paper - Shabby Chic.

I stamped 3 sets of the Bowl Bouquet on HP Colour LaserJet Paper using a Memento Ink pad and colour with Copic Markers.

The first layer is the full image and the second image is the 2 roses and the third image is the larger rose on the right. 

Once you have adhered the image to the lower left of your card, stamp the words 'You Mean So Much To Me' from Heartfelt Creations - Moments With You (HCPC3568) with Archival Jet Black.

Copic Markers: E59, E47, E41, E43, E35, YG63, YG67, YR23, Y21, B000, B00, RV52, RV55 and RV34

Happy Stamping
Michelle

Saturday, 21 February 2015

Sunflowers (again)

Hi Everyone

I know, it's my 4th Sunflower card, but I saved my favourite for the last.

This card was made with 2 Bazzill Ivy cards joined with a thin strip at the back, making it a 4 panel card.

On 3 pieces of HP Colour LaserJet paper, stamp the Heartfelt Creations Classic Sunflower (HCPC3626) stamp using a Memento ink pad and colour with Copic Markers.  Take your time, you'll be colouring this for a while.

On the last panel, stamp the single sunflower from 'Sunflower Patch' (HCPC3629) on the lower part and mount up the words from Heartfelt Creations 'Classic Message' (HCPC3354).

Adhere the layers to the front of each panel and you're done.

Copic Markers: R39, R37, E31, E37, E29, E35, YG63, YG67, G99, Y06, Y35, YR16.

Happy Stamping
Michelle

Wednesday, 18 February 2015

Thank You

Hi Everyone

My Sunflower journey continues with this Thank You card.

Starting with a base card of Bazzill Ivy, I layered up with Beeswax, Sandbox and Leapfrog.

On the Leapfrog card, I stamped the single Sunflower from the Heartfelt Creations - Sunflower Patch (HCPC3629) stamp set using an Archival Olive Ink pad.

From the Heartfelt Creations Die set (HCD2743) Raindrops on Roses, cut the frame from Bazzill Mocha Divine and adhere to the front of the card.

On HP Colour LaserJet paper, stamp the Sunflowers from Sunflower Bouquet (HCPC3628) and Sunflower Patch (HCPC3629), colour with Copic Markers and cut out.

Lastly, cut a flag and stamp 'Thank You' from Darkroom Door's Bright Blossoms Vol 2 (DDRS108) and adhere in place.

Copic Markers: YG63, YG67, YR16, Y17, E37 and E29.

Happy Stamping
Michelle

Sunday, 15 February 2015

Happy Forever

Hi Everyone

This verse makes me smile when I see it, funnily enough, it's from a stamp set by My Favorite Things which includes lots of wedding and anniversary verses - Together Forever.

Starting with a card base of Ivy, I then added Lily White and then another layer of Lily White which I blended Distress Ink Pad - Crushed Olive over and stamped Darkroom Door's Chicken Wire and French Script background stamps over it. 

On a piece of HP Colour LaserJet paper, stamp the corner piece from Heartfelt Creations' Sunflower Bouquet (HCPC3628) using a Memento ink pad.  Stamp the background stamps again, the verse in the top right and then blend Crushed Olive around the edges again.

Stamp additional Sunflowers and build a cluster of sunflowers, curling the petals and only adhering the centre of the flowers.

Copic Markers YG63, YG67, YR16, Y17, E37 and E29. 

Happy Stamping
Michelle

Thursday, 12 February 2015

Classic Sunflower

Hi Everyone

I've always loved Sunflowers and the Heartfelt Creations sets have me hooked.

Over the next week, I'll show you some cards I made with the Heartfelt Creations sets.

Here is my first of 4 cards that I would like to share with you.  Starting with Bazzill Ivy card and then a layer of Beeswax.  On HP Colour LaserJet paper, I stamped the Classic Sunflower stamp (HCPC3626) using a Memento black ink pad.

Then started the colouring, using Copic Markers, I coloured the flowers, leaves and seeds and then blended a little Distress Ink Pad - Peeled Paint around the edges.

On a scrap of HP Paper, I stamped one of the stamps from the stamp set 'Moments With You' (HCPC3568) and coloured with the Copic Markers.  Mount it onto the card in the lower right.

Copic Markers: R39, R37, E31, E37, E29, E35, YG63, YG67, G99, Y06, Y35, YR16.

Happy Stamping
Michelle

Monday, 1 September 2014

Calendar Project 2014 - September

Hi Everyone

Phew, where did August go.  This month I started a new full time job and I have been flat out getting up to speed with it - apologies for the lack of posts in August.

Here we have the last of Linda's calendar pages.  Linda loves using Mirror board and the back card and decorative corner.

The Blue card is Bazzill and Linda stamped the Heartfelt Creations -Sun Kissed Fleur Swirls (HCPC3537) and added some extra layers. The images were embossed with Silver embossing powder and coloured with some touches of Copic Markers.

The decorative corners are from Heartfelt Creations - HCD729 Decorative Blossom Corner Die, cut from the mirror board.

Happy Stamping
Michelle
 

Tuesday, 29 July 2014

Sweet Treats

Hi Everyone

I've been playing with the Impression Obsession - Sweet Treats (K16004) and created this card.

The card base is Bazzill Sunbeam followed by Lily White and finally Dotted Swiss.

The image was stamped 3 times on HP Colour LaserJet Paper (300gsm) using a Memento ink pad.  On the base image, I coloured a little Distress Scattered Straw around the edges and then coloured the frame and a couple of leaves in the background with Copic Markers.

The next layer, I focused on the flowers and kettle and lastly the top layer is the teacup and cupcake, cookie and present.

The Copic Markers I used include YG63, YG67, B00, B02, B05, B28, YR23, Y21, E40, E41, E43, E47 and E49. 
Happy Stamping
Michelle


Thursday, 20 February 2014

Hi Everyone
 
We'll it's set up day in Melbourne so we are limbering up for what we hope to be a record braking set up but I have to be realistic and if we're done before dusk, I'll be happy.... given Melbourne has daylight saving, I think we have a good chance.
Here's a card I made on the weekend using new stamps from Heartfelt Creations Majestic Morning stamp set (HCPC3582).
 
I stamped the image 3 times and used part of it on top of each other.  The first layer is the Vase which has been coloured with Copic Markers E41, E43, E47 and E49.  The next layer is the leaves which were coloured with Copics YG63 and YG67.
The next layer is the background flowers, coloured with Copic Markers R81, R83, R85 and RV69.  The next image is the main flowers, coloured with the same Copics and then the last layer (yes, another) was the inner part of the flowers, finished with a small dot of Yellow Viva Décor Pearl Pen.
 
I mounted the image on Bazzill Aloe Vera which I had pre-stamped with Darkroom Door French Script background stamp in Archival Coffee and then Lily White.
 
I added layers of Pinecone and Fawn, stamped with the French Script and backed with Lily White and lastly the Sweetheart card (also stamped with the French Script) and then onto the A5 Lily White card.
 
Have a great day and I hope to see you tomorrow at the Scrapbook and Papercraft Expo.
 
Happy Stamping
Michelle


Thursday, 6 February 2014

Wishing You A Very Happy Birthday

Hi Everyone

This Raindrops on Roses release from Hearfelt Creations has been one of my favourites.  This card is a really simple, but sometimes simple can be elegant.

Starting with a Bazzill Dotted Swiss Berry card and layered with Dotted Swiss Celtic Green and then HP Colour LaserJet Paper.

Start by stamping the Raindrops on Roses - Birthday background (HCPC3586) and then colour with Copic Markers - YG63 and YG67.  With the roses, I coloured with Copic Markers R85 and R83, but didn't colour the whole flower, I left the edges white..

On the 'Happy Birthday' banner, I flicked the R83 and R81 Copic Markers around the edges, again leaving the centre white.  With the circle, I coloured with Copic R83 and R85.  The edges are RV69.

I edged the 4 corners with May Road white organza ribbon with silver trim and then wrapped another layer around the lower part of the card.


I hope you enjoy this card.
Happy Stamping
Michelle


Tuesday, 4 February 2014

Gift Ensemble

Hi Everyone

Ok, yes I love the Darkroom Door - Bright Blossoms vol 2 stamp set and I'm attending therapy.

In our Christmas classes last year, we created a Christmas gift box using the Heartfelt Creations 'Gift Ensemble' die and here is a Valentine's version.

I have cut the box from 4 pieces of Bazzill Dotted Swiss - Rope Swing card and layered it with Pinecone.

I stamped the Roses on the 300gsm Watercolour paper using Distress Ink Pad - Fired Brick and blended the colour out with a waterbrush.

To make this box, fold back the decorative edges and adhere them together.  While still flat, adhere any decorations and then fold in the bottom and adhere together.  To secure the top, fold one in after the other.

Happy Stamping
Michelle 

Monday, 3 February 2014

My Wish For You

Hi Everyone

I've had heaps of fun playing with the new Heartfelt Creations - Floral Keys & Locket stamp set and the Magnolia Lost & Found stamp set.

Here's the first of my play cards.  The Floral Keys & Locket stamp set are code HCPC3572 and the Magnolia stamp I have used is - For You Tilda.  The background stamp is True Friends (CG420) from Hero Arts.

Ok, so that's the stamps, now down to business.  Starting with a Bazzill Lily White card, I layered with Bazzill Pajama and Pinecone.  True Friends was stamped on the Pinecone card with an Archival Jet Black ink pad.

The fence in the background is Magnolia's Heart Fence Doo-Hickey and then I added For You Tilda.

I coloured Tilda with skin with Copic Markers - E00, E11 and R20.  Her hair is with E40, E43, E47 and E49. Her overalls are coloured with E40, E43 and E47, the heart with R81, R83 and R85 and lastly the roses with R81, R83, R85, YG63, YG67 and YG03.  Super cute.

The 'My Wish for You was coloured using the same markers but it's actually 3 layers.  Layer 1 is just 'My Wish For You', coloured with E40 and E43, the roses and leaves.  The second layer is the ornament top and bottom (the centre of the oval has been cut out so the words show from the first layer) and then the 3rd layer is the oval on the top, coloured with Copics E40, E43, E47 and E49 and then covered with Glossy Accents.

Have a wonderful Monday
Happy Stamping
Michelle


Saturday, 25 May 2013

Heartfelt Creation - Roses

Hi Everyone

More playing with the Heartfelt Creations Vintage Floret Frame Precut Set (HCPC3522) this weekend where I went a little insane (more about that shortly).

I stamped the image on HP Colour LaserJet paper (200gsm) with Memento Tuxedo Jet Black and coloured with Copic Markers E43, E47, E49, YG63 and YG67.

I wasn't sure what I was going to do with the background, colour it?  distress it? no, I had to make it hard for myself and hand cut background away from the vine and leaves.... crazy I know!!!


I know that there is a die that does this, but I wanted to get a little closer and I love seeing the texture from the Bazzill Creampuff behind it.

The words in the frame are from Darkroom Door Full Bloom Vol 2 (DDRS004) and were stamped on Bazzill Mauve.


Anyone who attended our classes this month, would be familiar with the Roses from Heartfelt Creations Vintage Floret stamp set.  Stamped with Archival Coffee and coloured with Distress Ink Pad - Victorian Velvet.

Happy Stamping
Michelle


Thursday, 23 May 2013

Heartfelt Creations

Hi Everyone

This weekend I have been playing with the Heartfelt Creations - Vintage Floret Frame Precut Set (HCPC3522).

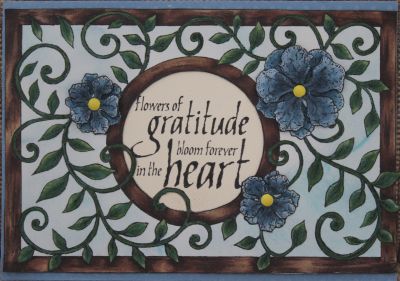
I stamped the image with a Memento Tuxedo Jet Black ink pad and coloured the background with Tumbled Glass Distress Stain.

I coloured the frame with Copic pens E43, E47 and E49.  The vine was coloured with YG63 and YG67 and then the flowers with B93, B95 and B97.

I cut out the centre circle and stamped the Darkroom Door words (from Full Bloom Vol 2 DDRS004) on Creampuff and inserted it behind.

The card was then mounted on Bazzill Dotted Swiss Rip Tide.

Happy Stamping
Michelle


09 10