Showing posts with label Elizabeth Crafts. Show all posts

Monday, 26 May 2014

Elizabeth Crafts - Jackie's Dolls in Ovals

Hi Everyone

My 'playing' with Elizabeth Crafts continues with this fantastic Accordion Oval Card.

The base card is made with Bazzill Lily White and I cut it out using Elizabeth Crafts Accordian Oval Card Die (772).

Using Bazzill Beetle Black, I created the border from the Elizabeth Crafts Oval Flourish Frame Edges (777) and adhered using Glossy Accents (but you could use double sided adhesive before cutting them out, I like Glossy Accents as it allows me some wiggle room).

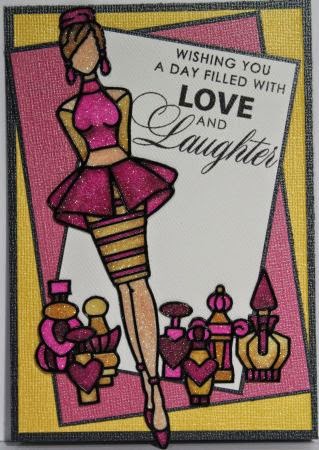
To create the gals, cut 3 pieces of Lily White and Double Sided Adhesives to the same size as the stickers.

Remove the release sheet and adhere one side to the Lily White card.  Remove each sticker and lay it sticky side up on the release sheet and then remove the other release sheet from the Lily White and place the sticky side of the double sided adhesive on the sticky stickers.  Remove the release sheet and dip the stickers into Elizabeth Crafts 'Cool' Silk Microfine Glitter. 

There are extra layers for the 'Gals' on the sticker sheet, so repeat the process with these and adhere to the main images.

Cut out the Gals and colour with Copic Markers E11, YR23, E35, E59, Y21, R59, R29 and 100.

Happy Stamping
Michelle


Saturday, 24 May 2014

Elizabeth Crafts - Jackie's Dolls 2

Hi Everyone

I'm covered in glitter and happy as can be.

The Elizabeth Craft stickers have me hooked, especially as I get great effects using my favourite colouring markers - Copic Markers.

This stamp set has 2 girls on it and lots of images around the edges, so I had to make 2 cards because if I left one girl on the sticker, she'd be upset - wouldn't she??

Ok, so my first card is the blue dressed lady.  The card base is Bazzill Lily White and I added layers of Bazzill Bling - Prince Charming and Flirty. 

To make the girl, start with a piece of Lily White, cut to the same size as a piece of Double Sided Adhesive Sheet.  Remove one side of the D/S Adhesive and adhere it to the smooth side of the Lily White.  Keep the release sheet and remove the sticker and place it sticky side up on the release sheet (a little tricky to do, but licking your fingers means that the sticker won't stick to it).

Remove the release sheet from the other side of the D/S Adhesive and place it sticky side down onto the sticky stickers.  Remove the release sheet and dip your piece of paper in Elizabeth Crafts Cool Silk Microfine Glitter.  Press the glitter into the sticker and tap off any excess.

Colour the lady with Copic Markers E11, YR23, E35, E59, B28, B05, V09, V17 and V15.  Cut out and adhere to the front of your card.

The second card has a base of Bazzill Bling Black Tie and layered with Feather Boa, Bling and Lily White.

The lady and perfume bottles were made using the same technique and with Copic Markers E11, YR23, E35, E59, Y21, RV69 and RV04.

On the sticker, there are additional layers to be added to the image and creates a lovely dimension to the cards.

Happy Stamping
Michelle


Friday, 4 April 2014

Elizabeth Crafts

Hi Everyone


I've never really been into stickers, I've always been a 'Stamping Girl' but I came across Elizabeth Crafts at CHA and was instantly attracted to their new dies and then saw what they were doing with Copics and glitter - I was like a moth to a flame.

In the April Class, one of our projects involves this technique, but I thought I would give everyone a look, one a different card.....here goes.


Matterials needed:
Transparent Double Sided Adhesive
Silk Micro Fine Glitter
Stickers
Copic Markers


Step 1

Cut a piece of Double Sided Adhesive to be a little larger than your sticker.  Remove one side of the adhesive and adhere it to a white piece of card.  Hold onto to the release sheet.
Remove the sticker by gently wiggling it off the sticker sheet.  This will prevent it from losing it's shape and lay it sticky side up on the release sheet. 
Now take the double side adhesive piece and lay it on top of the sticker and remove the release sheet.  You now have a very sticky piece of card with the sticker attached to it.
 
Step 2
Dip the sticky card in Silk Microfine Glitter so that it is fully covered in glitter.  

 
Step 3
Start colouring your image.  In mine, the background is YG11 and the leaves and stem are YG67,  To lighten the colours, use a 0 marker.

 
Now colour the flowers, I have used RV69, RV27, YR23 and the 0 marker to lighten the colours.

 
Step 4
Cut out the image and prepare your card.  I find it best to dip the image in glitter again, as when you cut out the image, some double sided adhesive might be exposed and feels a little funny.
When finished, you will have this lovely sparkly image.
Happy Stamping
Michelle

 
09 10